Printing Asset Labels
Choosing label stock, printer settings that actually produce correct-sized labels, and what each part of a label means.
Every unit in Invy can be given a printed label carrying a QR code and its Invy ID. Select units in your inventory, choose Print Labels, and Invy builds a print-ready PDF in the background — a download link appears when it’s finished.
The single most important setting
Print at 100% (actual size). Never “fit to page”, “shrink to fit”, or “scale to fit”.
This is the cause of the overwhelming majority of label printing problems. Scaling is usually on by default, and it silently shrinks the page by a few percent so that everything still fits inside your printer’s unprintable margin. The result looks almost right — until you hold a label against the sheet and find every one is a millimetre or two out, drifting further down the page with each row.
In the print dialog, look for a “Scale” or “Page Sizing” option and set it to 100% or Actual size. In Chrome’s PDF viewer this is under More settings → Scale → Default, which is not the same as “Fit to printable area”.
Check it before you print a batch
Go to System Settings → Organization → Asset Labels and choose Print Test Sheet. This prints one page of empty label outlines for your chosen stock, including a 50mm reference bar.
Measure that bar with a ruler. If it isn’t 50mm, scaling is on — fix that first, because nothing else on this page will help until it measures correctly. On die-cut stock, also hold the sheet up to the light and check the printed outlines line up with the actual die-cuts.
Choosing your label stock
Go to System Settings → Organization → Asset Labels and pick the stock you actually print on:
| Stock | Size | Best for |
|---|---|---|
| A4 sheet (2 per row) | 92 × 48mm | Plain paper or large adhesive sheets. The default. |
| A4 Avery L7160 | 63.5 × 38.1mm, 21 per sheet | Standard office address-label sheets. |
| Brother QL 62 × 29mm | 62 × 29mm | Dedicated label printers with 62mm rolls. |
| Dymo LabelWriter 54 × 25mm | 54 × 25mm | Small Dymo roll labels. |
| Zebra 4 × 6in | 101.6 × 152.4mm | Zebra thermal printers. |
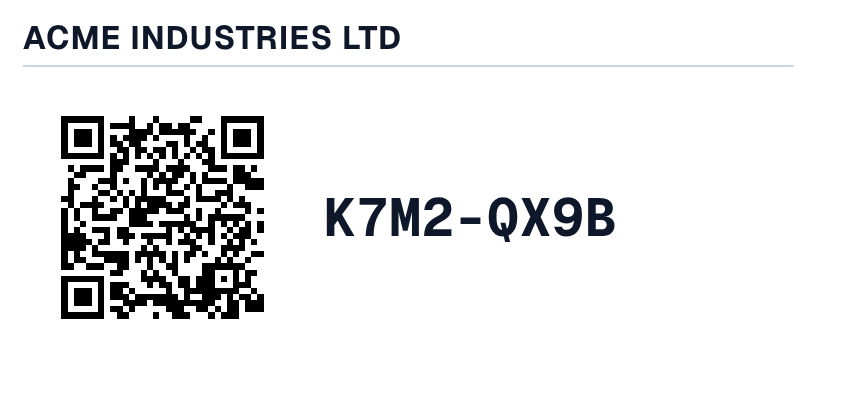
Invy adjusts the layout to match: smaller labels print less detail rather than shrinking everything until it’s unreadable. Every stock except the small Dymo label carries the full set of details — item name, category, Invy ID and serial number. The 54 × 25mm Dymo label drops to your organization name, the QR code and the Invy ID, because anything more would mean shrinking the QR code to a size that scans unreliably:
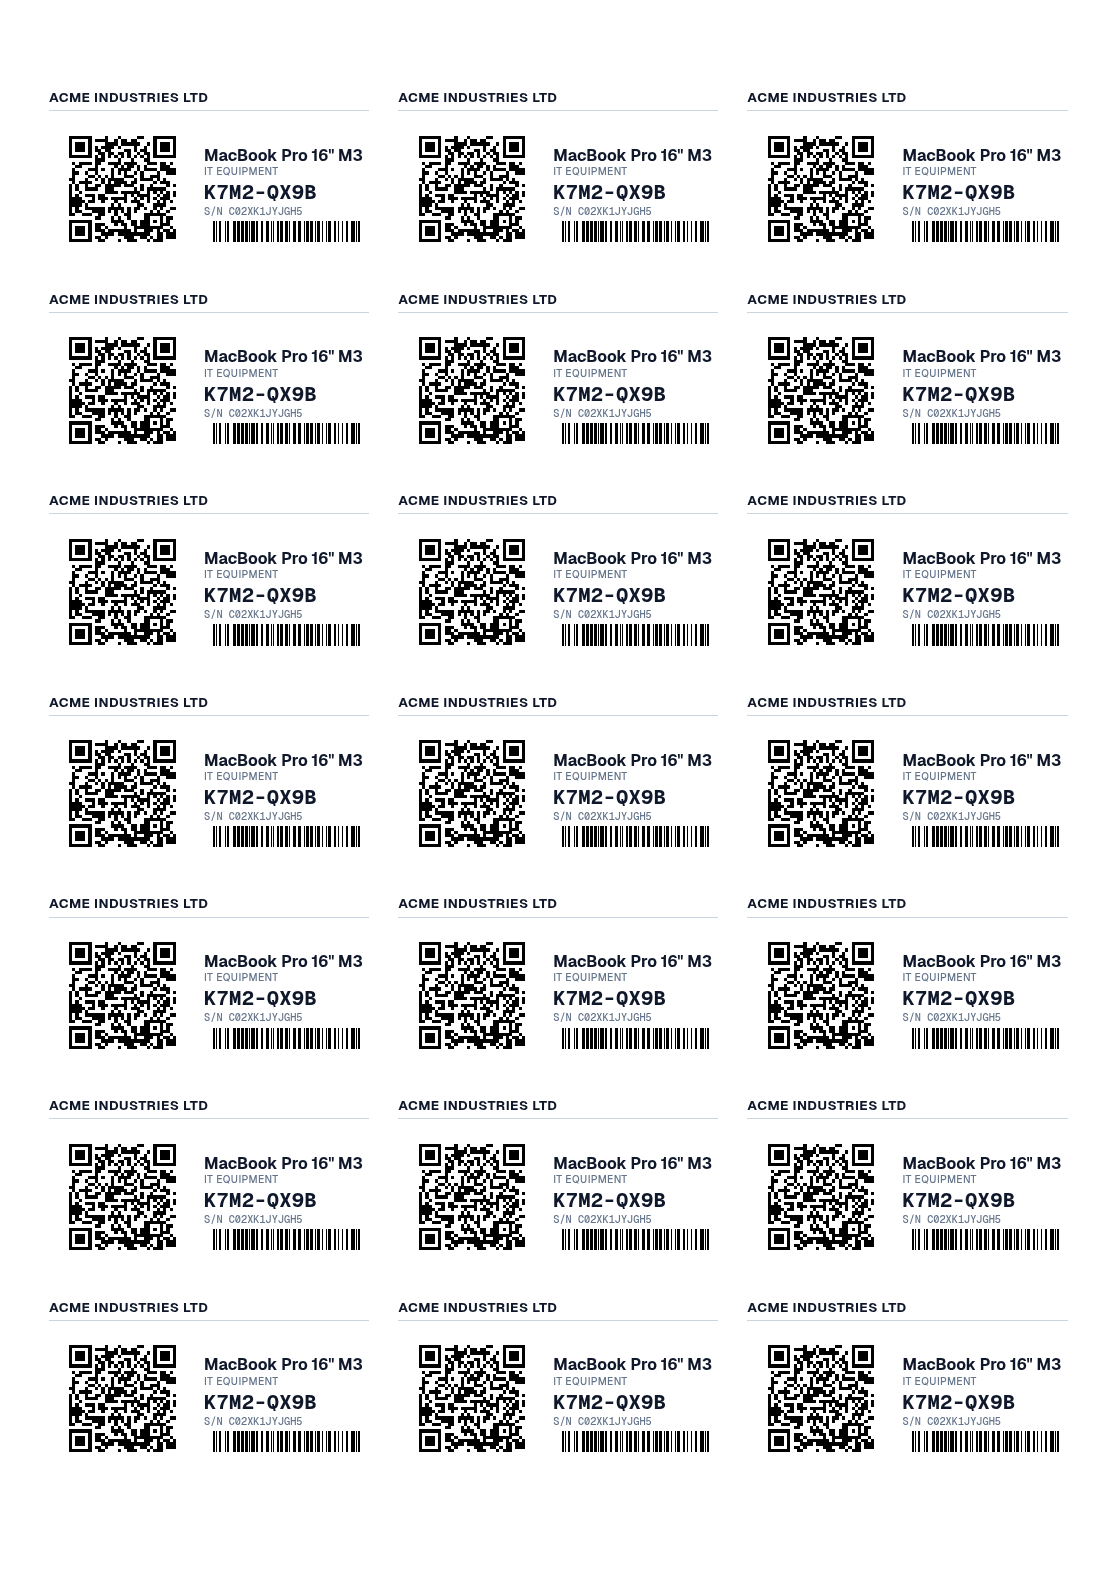
On sheet stock, labels are laid out to the exact die-cut grid of the sheet — here a 21-up Avery L7160:
If you don’t choose anything, you get the A4 sheet layout, which is what Invy has always printed.
Label printer setup
On a dedicated label printer (Brother, Dymo, Zebra), Invy sizes each PDF page to exactly one label, which is what the printer driver expects — it advances the media once per page.
Two things to check in the driver:
- Media size must match the stock you loaded. If the driver is set to 62 × 100mm and you loaded 62 × 29mm, output will be wrong no matter what Invy sends.
- Scaling off / 100%, as above.
What’s on a label, and why
Every label is laid out the same way, so anyone can read one at a glance regardless of which stock it was printed on:
- Your organization name runs across the top, full width — so a unit found elsewhere can be identified as yours.
- The QR code sits below it on the left.
- The unit’s details stack to the right of the code: item name, category, Invy ID, and serial number.
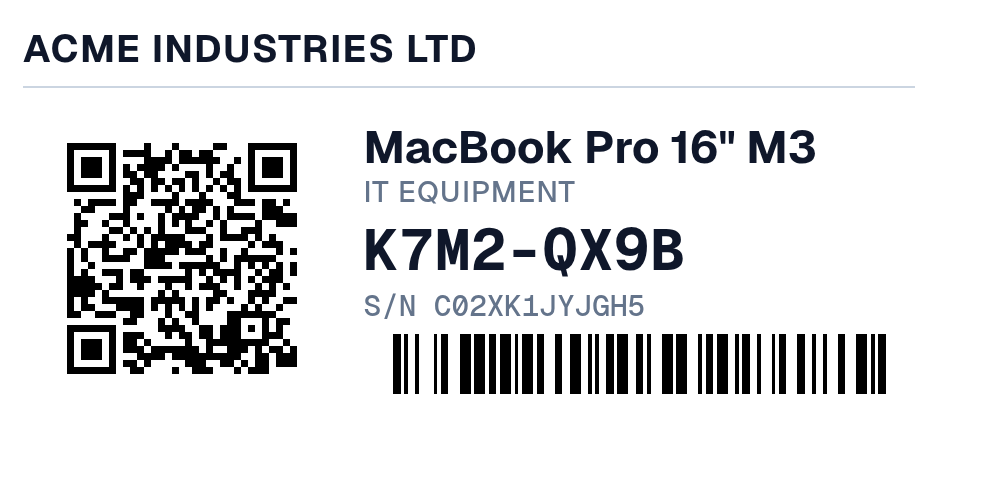
What each part is for:
- QR code — the important part. Scanning it opens that exact unit in Invy. It resolves by the unit’s permanent internal ID, so renaming an item or moving it to another folder does not break already-printed labels.
- Invy ID (e.g.
ABCD-EFGH) — the human-readable identifier, printed in large type beside the code so someone can read it aloud or type it in when a scan isn’t practical. - Item name, category, serial — context for anyone reading the label without scanning it. Omitted on the smallest Dymo stock.
Why there’s no location on the label
Labels deliberately do not print a folder or location. A unit’s location changes; a printed label doesn’t. A sticker asserting a location the unit left months ago is worse than one that says nothing, because it misleads an audit. Scanning the QR always shows the unit’s current location.
Barcodes for laser scanners
If your team uses handheld laser scanners (the red-line kind), those cannot read QR codes at all. Under Asset Labels, set Codes on each label to QR code + barcode (Code128) and each label will carry both.
The barcode encodes the Invy ID and is added only on label stock physically large enough to print one that scans reliably — on smaller stock it’s omitted automatically rather than printed too small to read.
Phone cameras and the Invy mobile app read the QR code, so the QR is never removed.
Scanning a label
- Signed in, on your organization’s device — scanning opens the unit directly in Invy.
- Signed out — you get a minimal page showing only the owning organization and the Invy ID, plus a sign-in link that returns you to the unit. Nothing about the item, its value, or its location is exposed.
- Signed in to a different organization — the label resolves to nothing, exactly as if the unit did not exist.
Troubleshooting
Labels are slightly the wrong size, or drift down the page.
Scaling is on. Print the test sheet and measure the 50mm bar to confirm, then see the top of this page.
The bottom row of an Avery sheet is misaligned.
Almost always scaling. If it persists at 100%, check that the driver’s paper size is A4 and not Letter.
A scanned label says the unit doesn’t exist, but it’s right there in my inventory.
You’re signed in to a different organization than the one that owns the label. Labels only resolve for the organization that printed them.
A QR code won’t scan.
Check it isn’t covered by tape or badly scuffed — the codes carry error correction and tolerate roughly 30% damage, but a fold straight through the middle can still defeat them. Make sure the white border around the code is intact; scanners need that clear margin.
Nothing prints on a label printer, or labels come out blank/half-printed.
The driver’s media size doesn’t match the loaded roll.